Securely SSH Into Your Home Server With Cloudflare Tunnels
Published 03/05/2025
Contents
1 Introduction
There are many reasons for setting up a home server. Perhaps you’d like to take control of your data by running your own cloud storage (using e.g. Syncthing), or you want to run your own web server, email server, or game server, or maybe you’d like to set up a secure and privacy respecting smart home (using e.g. Home Assistant). Whichever it is, chances are at some point you will want to SSH into your home server from outside your home network. This can be challenging for the following reasons:
- Most home networks do not have static IP addresses. Therefore you would need to update the IP address of your SSH connection every time it changes. Furthermore, when your router’s IP address changes, there is no straightforward way of finding out the new IP address if you are not already connected to your home network.
- Most home routers block inbound connections (for security reasons), necessitating the setting up of port forwarding to allow SSH connections from outside your home network.
A solution to the first issue is to utilise a dynamic DNS (DDNS) service. This can be done in one of two ways.
The first is to sign up to a DDNS service such as Duck
DNS or No-IP and configure your
router to update the IP address the DDNS service has on record whenever
it changes.[1][1]: It is worth
checking if your router supports dynamic DNS. You can then
connect to your server on
<your-subdomain>.duckdns.org (the URL obviously
depends on the selected DDNS service).
The second is to purchase a domain of your own, and automatically update its DNS records when your router’s IP address changes, using e.g. ddclient or a similar software running on your server, or if you are managing your DNS records via Cloudflare and you prefer a DIY solution, you could write a script that automatically updates DNS records via Cloudflare’s API.
Note that both of the above solutions require you to setup port forwarding on your router.[2][2]: Most domestic routers these days support port forwarding, but not all! They also require making your home network’s IP address publicly available via a DNS record. This is potentially problematic for two reasons. Firstly it makes your home network susceptible to denial-of-service (DoS) attacks, and secondly it allows third parties to attempt to connect to devices on your home network via the open ports.[3][3]: The second issue can be somewhat mitigated by choosing an uncommon, high-numbered port for forwarding, however this doesn’t stop a third party from conducting a port scan to find out which ports are open. While your server should obviously require authentication for SSH connections (preferably using an SSH key rather than a password), a sufficient number of simultaneous connection attempts from malicious bots could still degrade the quality of your network connection significantly, even though those connection attempts may ultimately be futile. They also pollute your SSH logs.
To avoid exposing your home network’s IP address, you can utilise a Cloudflare Tunnel to connect to your server. This article explains how to set this up.
2 What is a Cloudflare Tunnel?
A Cloudflare Tunnel is created via the Cloudflare Zero Trust
dashboard and requires running the open-source daemon cloudflared
on your server. This command-line client initiates a connection to the
Cloudflare network, removing the need to open any ports on your router
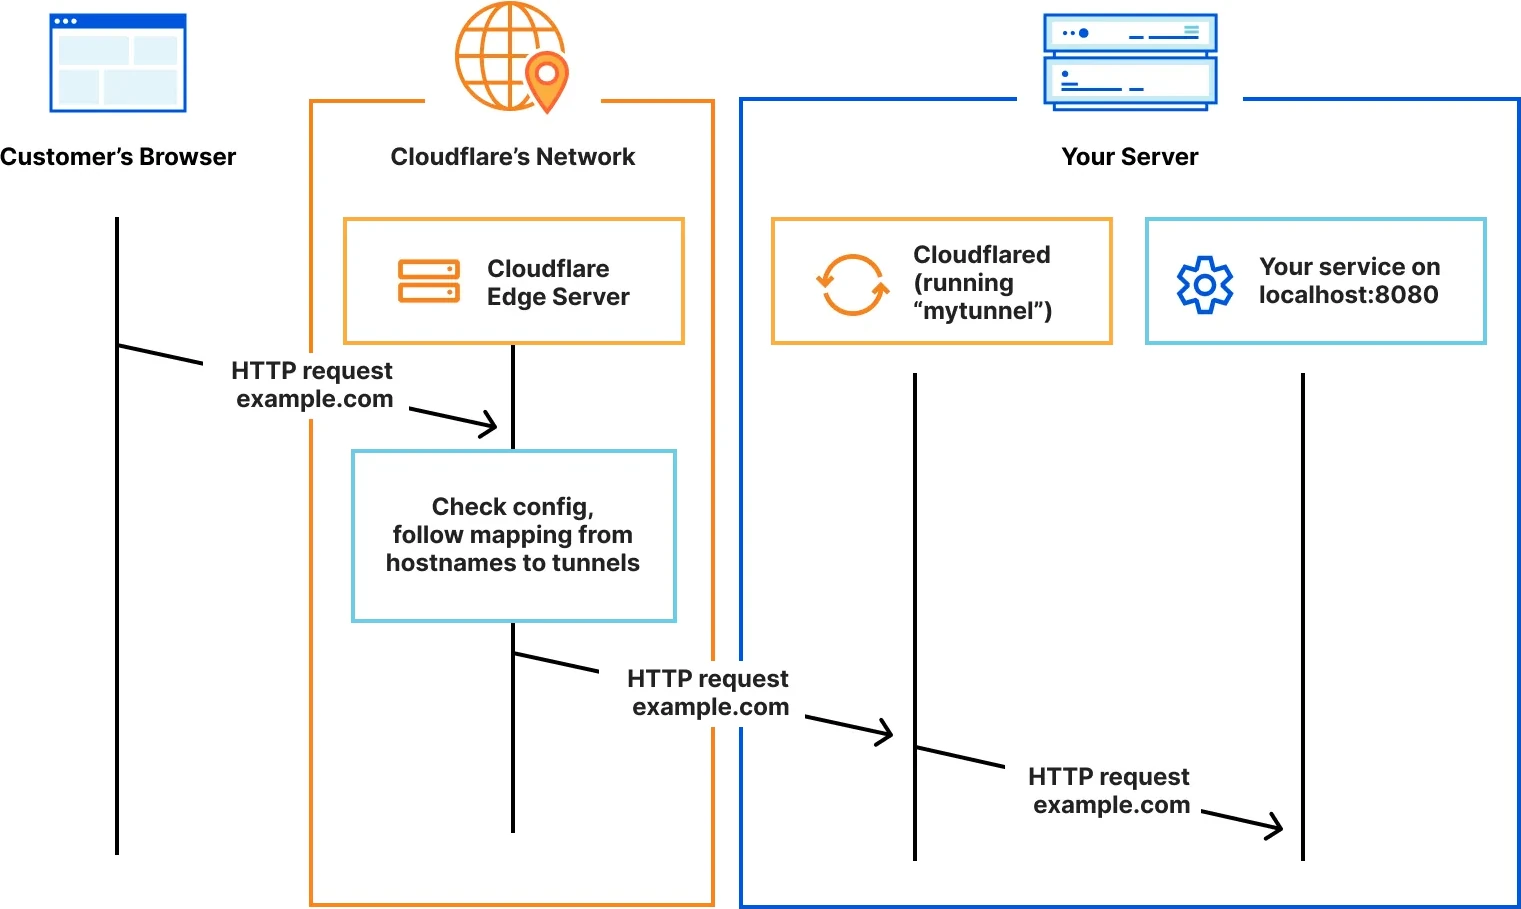
(because the connection is outbound rather than inbound). Typically,
Cloudflare Tunnels are used to expose local or internal services such as
web apps or APIs to the internet without opening inbound ports on your
firewall or router (see Fig. 1). Cloudflare Tunnels offer the added
benefit of providing authentication services via Zero
Trust access policies, which allow fine-grained control over who has
access to your application, e.g. via various identity providers (IdP) or
a pin sent to one’s email address. However, a Cloudflare Tunnel can also
be used for SSH. This keeps the connection encrypted all the way to the
server, which isn’t the case with an HTTP/HTTPS Cloudflare Tunnel (where
the data is decrypted and re-encrypted by Cloudflare).
There are serveral
options available for connecting with the server. The option
recommended by Cloudflare requires installing the WARP
client on the connecting device. The WARP client appears to be a
closed-source binary, and I generally don’t run those on my computer.
Luckily, the last option listed (‘SSH with client-side cloudflared’),
which is marked as ‘legacy’, can be used instead. This option utilises
cloudflared on the client side as well to connect to the
tunnel.
3 Setting up a tunnel
Tunnels can be set up either via the dashboard or the API. We’ll be using the dashboard here.
Enroll in Cloudflare Zero Trust by following this link. You will be asked to make a payment of $0.00.
In the pane on the left, go to Networks -> Tunnels. Select ‘Create a tunnel’.
For the tunnel type, choose ‘Cloudflared’. This will use the above-mentioned
cloudflareddaemon.Choose a descriptive name for your tunnel, such as ‘tunnel’.
You will now need to install
cloudflaredon your server. Depending on your OS, the official package repository may already contain the daemon. The webpage should offer installation instructions for all kinds of operating systems, with the instructions for Debian listed by default. Oncecloudflaredis installed, you will need to configure it to connect to the tunnel you have created. To do this, run the command listed under ‘If you already have cloudflared installed on your machine:’ on your server. This command is:sudo cloudflared service install <token>This will create, start, and enable a systemd service running
cloudflared, as well as add the tunnel you have created (therefore, your server will automatically reconnect to the tunnel on every reboot). When your server connects to the tunnel, the connection will appear in the browser window under ‘Connectors’.When this is complete, click ‘Next’.
You will now need to add a public hostname on which the tunnel is reachable. This requires you to own a domain which is managed through Cloudflare. If you already own a domain managed on Cloudflare, you can specify a subdomain to be used for the tunnel. Optionally, you can use a path on the domain for the SSH tunnel.
Under ‘Service’, select ‘SSH’ as ‘Type’ and
localhost:22as ‘URL’. Click ‘Save tunnel’.
4 SSH-ing into the server
To SSH into your server, install cloudflared on the
client machine as well. Then add the following ProxyCommand
line to ~/.ssh/config (replacing
subdomain.example.com with the domain on which the tunnel
has been configured):
Host my-server
    ProxyCommand cloudflared access ssh --hostname subdomain.example.com
    User uname
    IdentityFile ~/.ssh/identity-file
If all went well, you should now be able to SSH into your server with
ssh my-server.
5 Restricting SSH connection attempts
In Sec. 3, we addressed one of the issues of a DDNS setup — the need to configure port forwarding. Since the domain of your SSH tunnel is managed through Cloudflare, you also have automatic DDoS protection. However, we still haven’t solved the issue of anybody being able to make SSH connection attempts. To address this, we can require users to authenticate themselves via Cloudflare before being allowed to make a connection attempt. To this end, we can add a self-hosted application:
Back in the Zero Trust pane, go to ‘Access’ -> ‘Applications’. Select ‘Add an application’ and select the ‘Self-hosted’ type.
Enter an application name (such as ‘ssh’). The ‘Session duration’ determines how long the authentication will be valid for.
Click ‘Add public hostname’ in the ‘Basic information’ area. Enter the same (optional) subdomain, domain, and (optional) path you selected when you set up the tunnel in Sec. 3.
Under ‘Access policies’, select ‘Create new policy’. A new window should open, allowing you to add a policy. Enter a policy name (e.g. ‘allow me!’). Under ‘Add rules’, select ‘Emails’ under ‘Selector’, and add your email address. Select ‘Save’.
Back in the previous browser window, you should now be able to select the policy you just created. This will result in an email with a PIN code sent to your email address everytime you want to connect, thereby preventing random connection attempts. Click ‘Next’ at the bottom of the page.
The next page optionally allows you to customise various settings. Click ‘Next’.
Click ‘Save’.
That’s it! When you now SSH into your server
(ssh my-server), a browser window should open asking you to
enter your email address. Subsequently, a code will be sent to this
address, which needs to be entered in order to allow the connection
attempt.